2024.1.29更新
2024.3.2
基本概念
所用外设:
DS18B20温度传感器(OneWire协议)
#前置概念
一、OneWire(单总线)协议
•单总线(1-Wire BUS)是由Dallas公司开发的一种通用数据总线
•一根通信线:DQ
•异步、半双工
•单总线只需要一根通信线即可实现数据的双向传输,当采用寄生供电时,还可以省去设备的VDD线路,此时,供电加通信只需要DQ和GND两根线
二、单总线电路规范
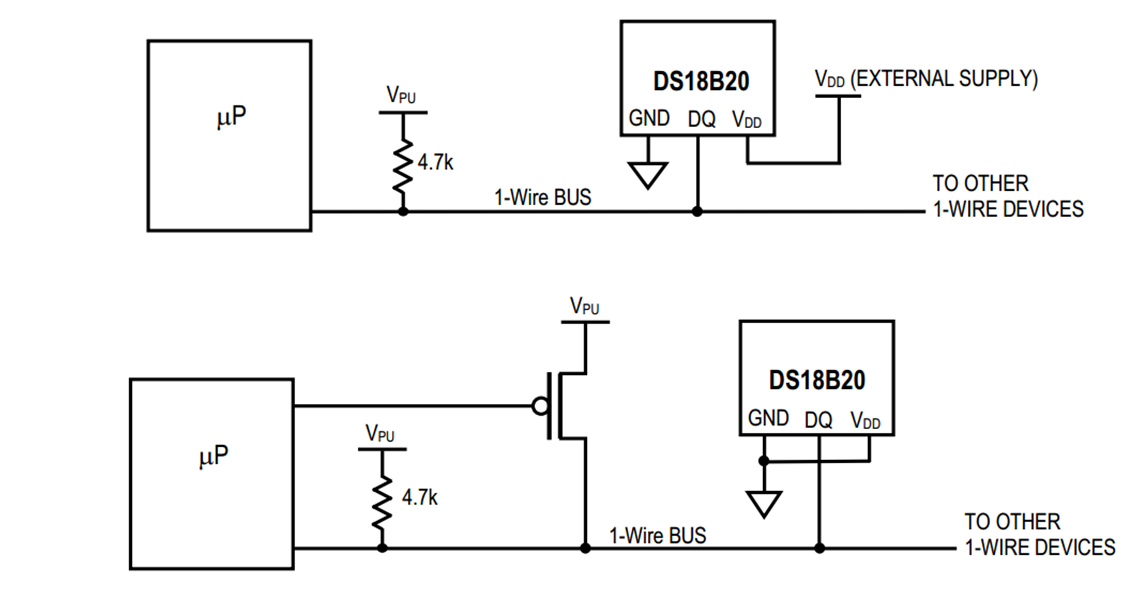
•设备的DQ均要配置成开漏输出模式
•DQ添加一个上拉电阻,阻值一般为4.7KΩ左右
•若此总线的从机采取寄生供电,则主机还应配一个强上拉输出电路

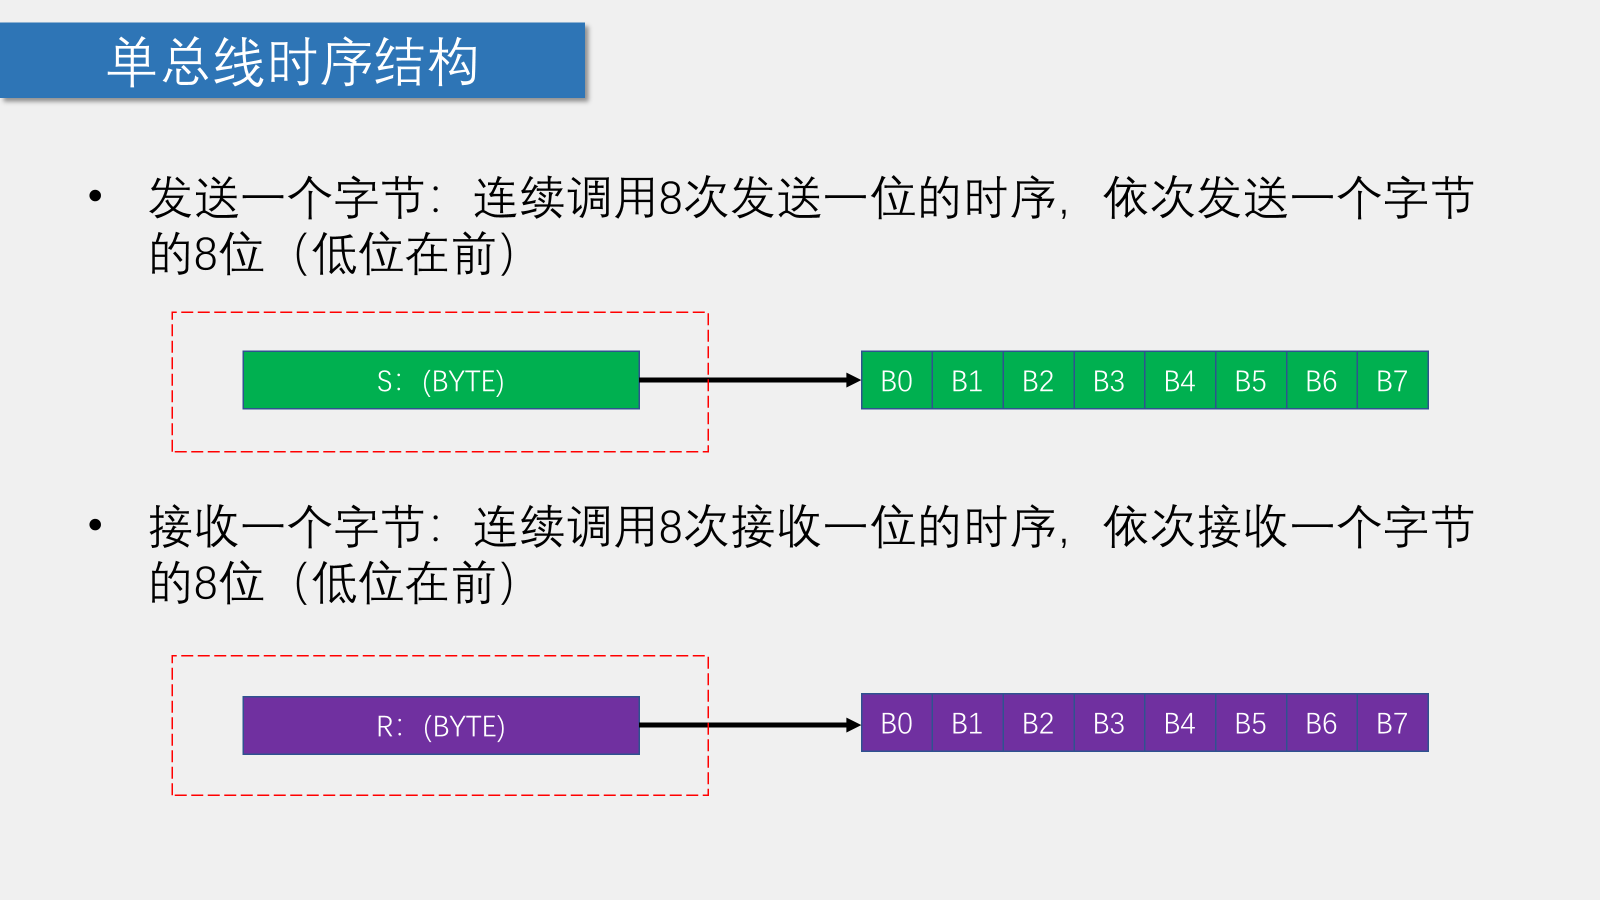
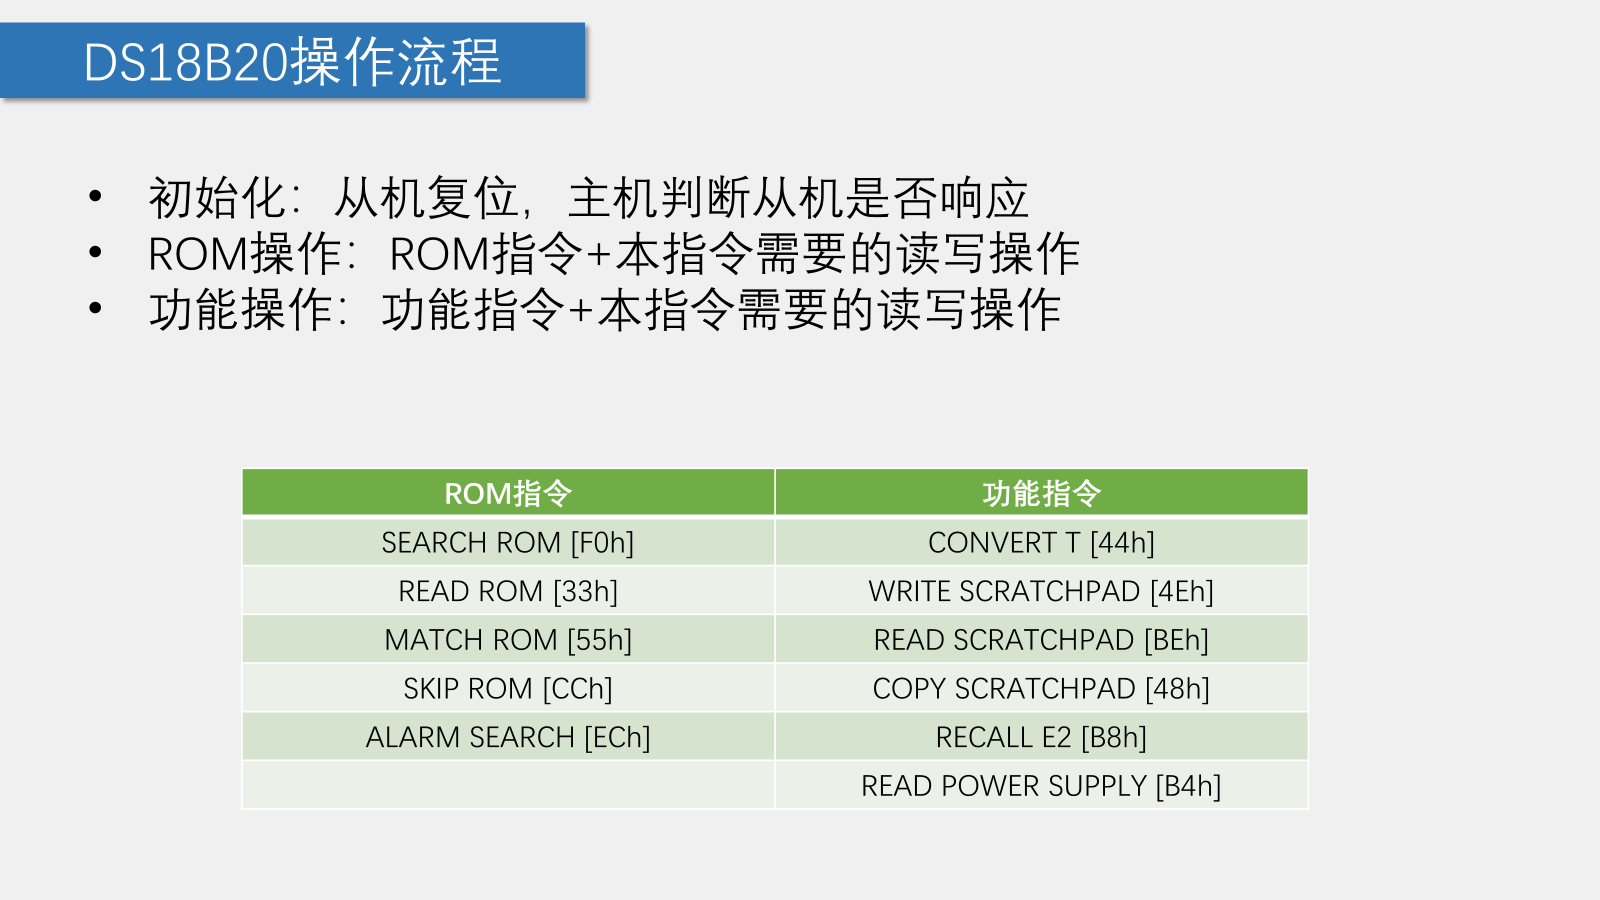
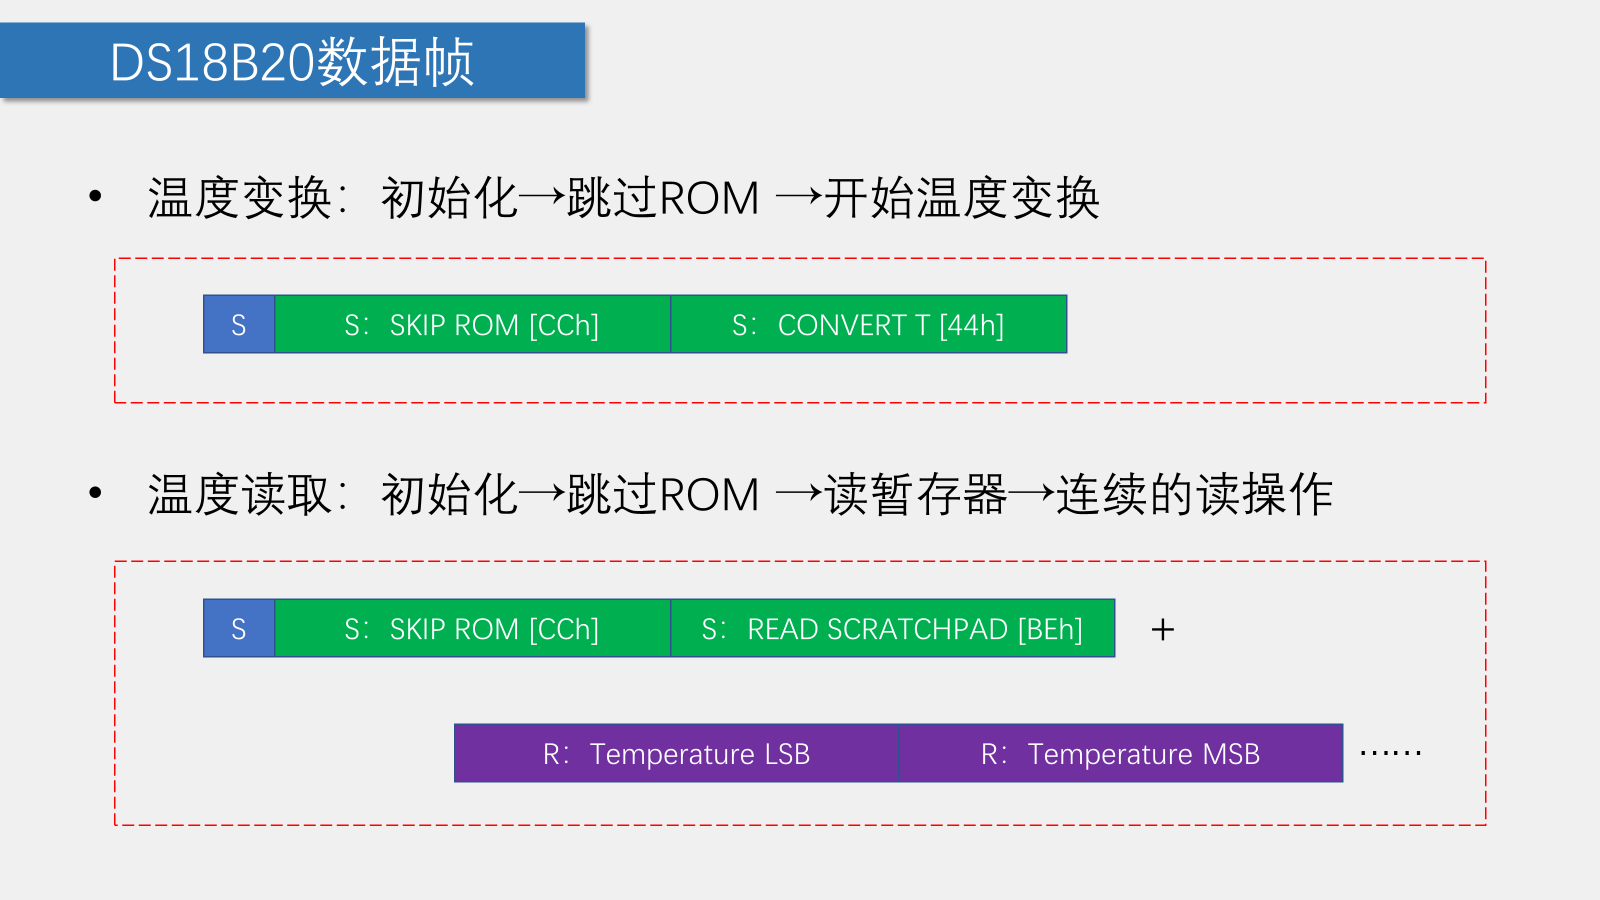
三、单总线的时序结构


DS18B20介绍
•DS18B20是一种常见的数字温度传感器,其控制命令和数据都是以数字信号的方式输入输出,相比较于模拟温度传感器,具有功能强大、硬件简单、易扩展、抗干扰性强等特点
•测温范围:-55°C 到 +125°C
•通信接口:1-Wire(单总线)
•其它特征:可形成总线结构、内置温度报警功能、可寄生供电
一、DS18B20温度存储格式

MS BYTE和LS BYTE两个字节中BIT的解释:
BIT16~BIT11作为符号位,表示温度的正负
BIT10~BIT4存储温度的整数部分
BIT3~BIT0存储温度的小数部分(精度),BIT0 ‘1’对应 "0.0625"
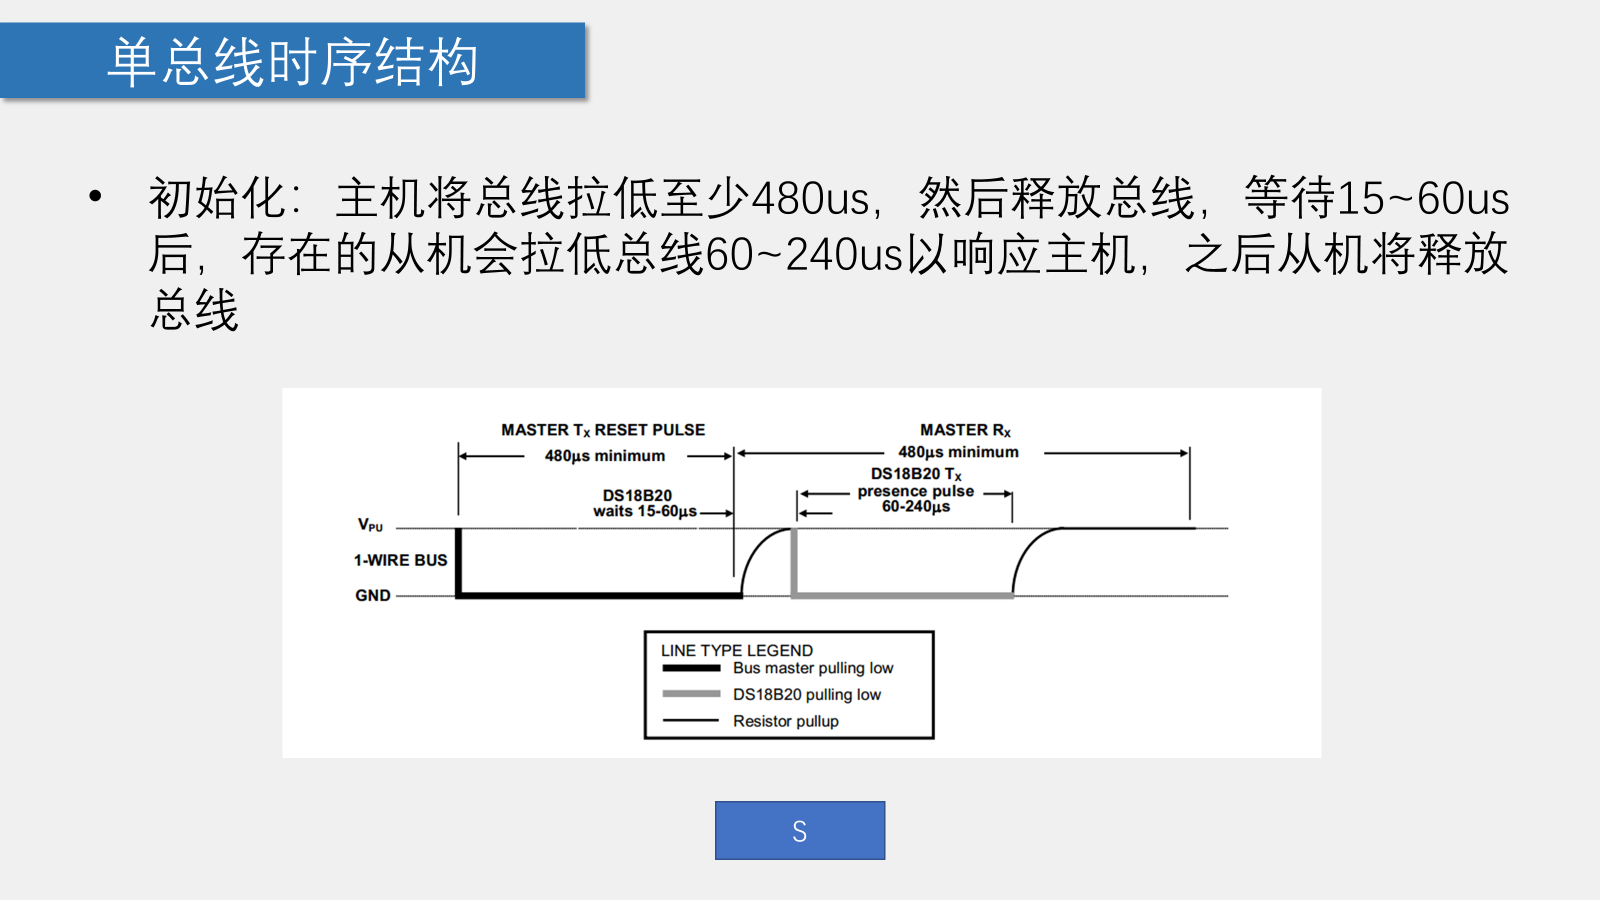
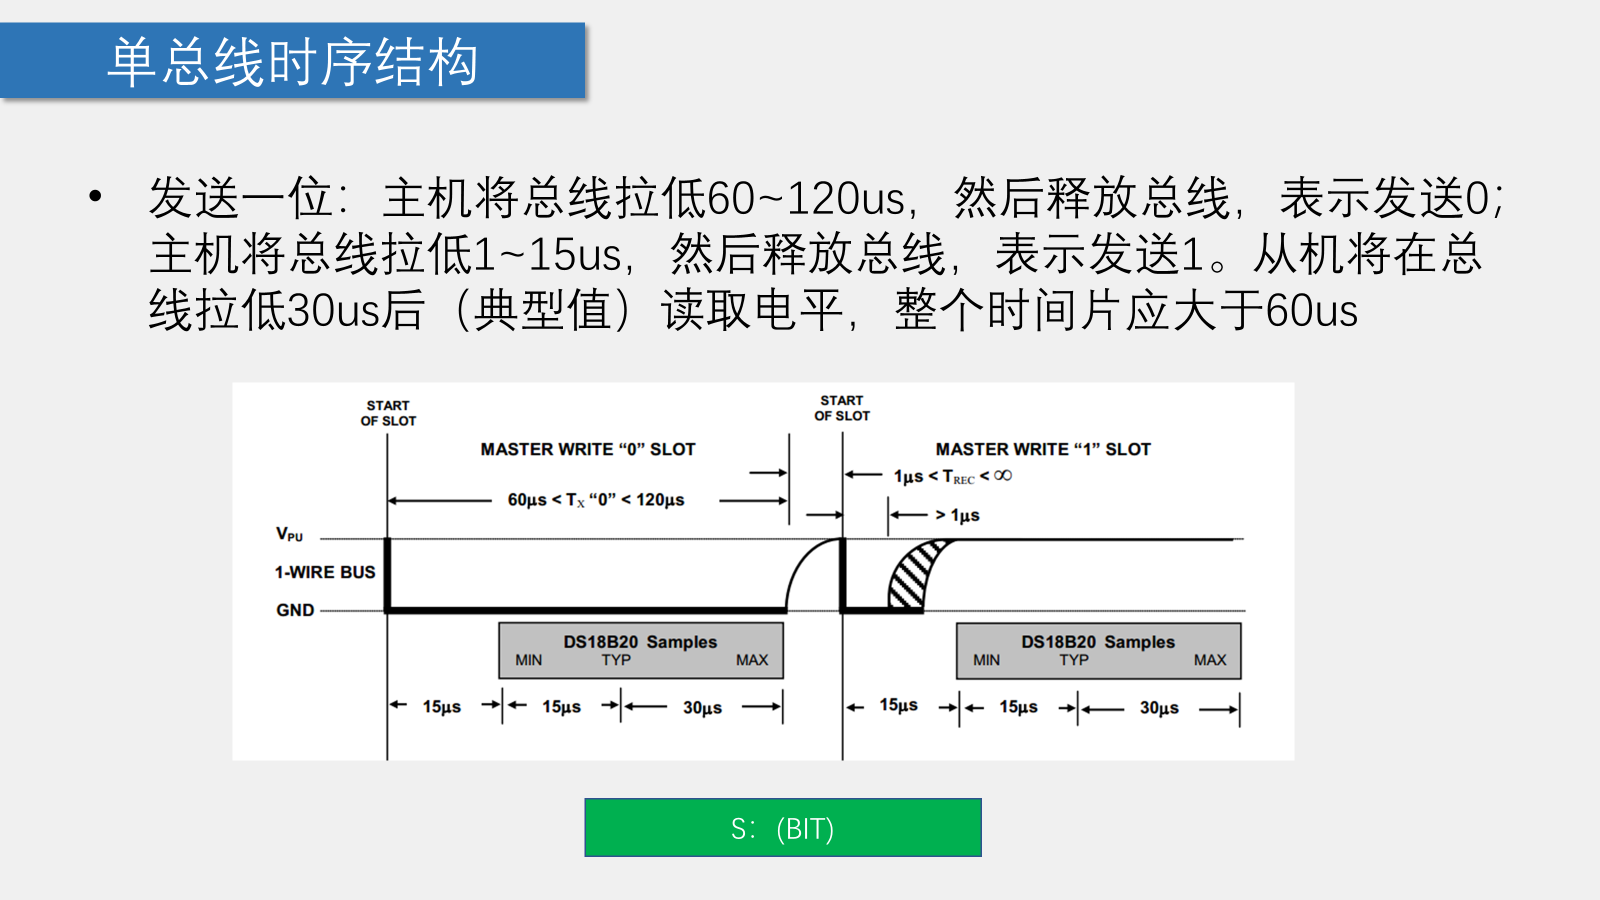
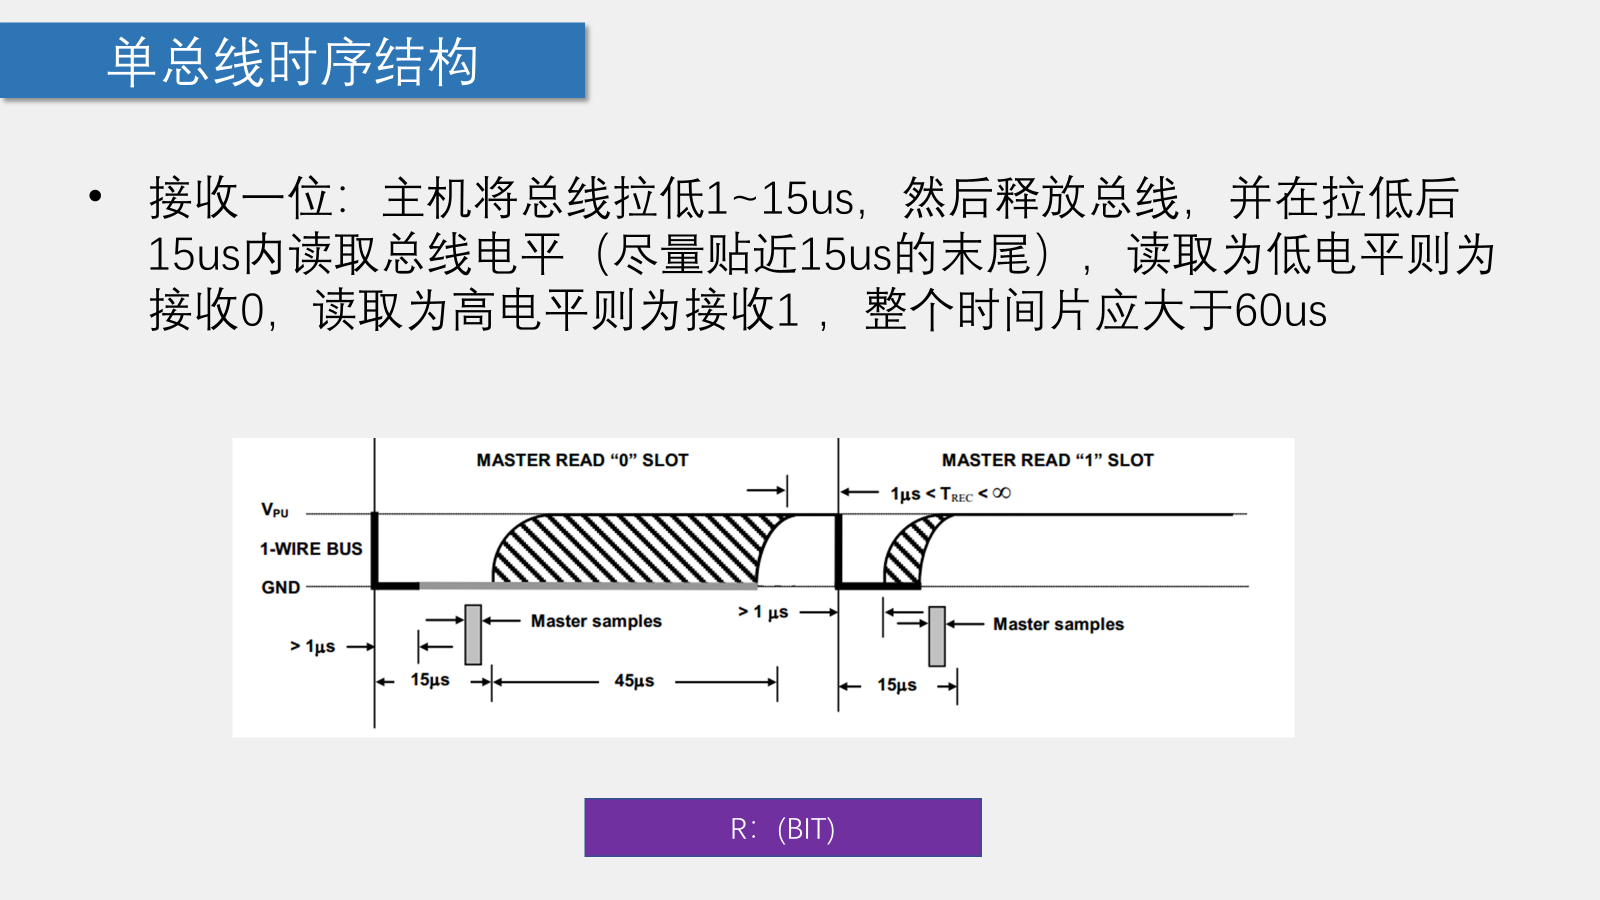
二、DS18B20时序


三、程序编写
首先写第一个函数,用于初始化,其中添加Askbit,在LCD1602上显示一个数值,观察初始化函数是否有效,即从机是否响应。
首先编写好单总线的初始化程序,如果代码正确,根据单总线的通信协议,从机会发送一个应答信号(拉低总线)。
进行应答测试,通过LCD1602观察应答位,检测代码是否有效
1
2
3
4
5
6
7
8
9
10
11
12
13
14
15
|
sbit OneWire_DQ=P3^7;//通信口
unsigned char OneWire_Init(void)
{
unsigned char i,Askbit;
OneWire_DQ=1;
OneWire_DQ=0;
i = 227;while (--i);//500um
OneWire_DQ=1;
i = 29;while (--i);//70um
Askbit = OneWire_DQ;
return Askbit;
}
|
一、DS18B20温度读取
将程序下载到单片机上,运行
如下为main.c文件
1
2
3
4
5
6
7
8
9
10
11
12
13
14
15
16
17
18
19
20
21
22
23
24
25
26
|
void main()
{
LCD_Init();
LCD_ShowString(1,1,"Temperture:");
DS18B20_Start();
while(1)
{
unsigned int temp=DS18B20_Read()*10000;
if(temp>0)
{
LCD_ShowString(2,1,"+");
}
else if(temp<0)
{
LCD_ShowString(2,1,"-");
}
LCD_ShowNum(2,2,temp/10000,4);
LCD_ShowNum(2,6,temp%10000,4);
}
}
|
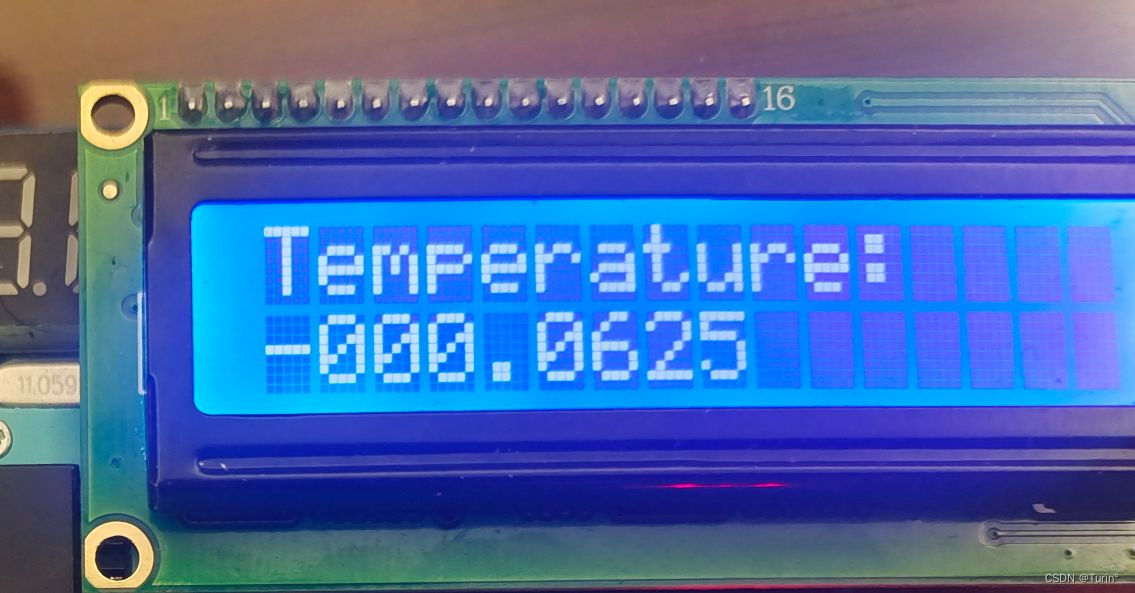
结果异常:LCD1602第二行显示不正确数据/显示-000.0625
分析:
main.c中存在语法错误
OneWire.c DS18B20.c中的函数时序定义有误

对main.c进行更改
1
2
3
4
5
6
7
8
9
10
11
12
13
14
15
16
17
18
19
20
21
22
23
24
25
26
27
28
29
30
31
32
33
|
float T;
void main()
{
DS18B20_Convert();
Delay(1000);
LCD_Init();
LCD_ShowString(1,1,"Temperature:");
while(1)
{
DS18B20_Convert();
T=DS18B20_Read();
if(T<0)
{
LCD_ShowChar(2,1,'-');
T=-T;
}
else
{
LCD_ShowChar(2,1,'+');
}
LCD_ShowNum(2,2,T,3);
LCD_ShowChar(2,5,'.');
LCD_ShowNum(2,6,(unsigned long)(T*10000)%10000,4);//强制类型转换
}
}
|
OneWire.c 错误分析:
1
2
3
4
5
6
7
8
9
10
11
12
13
14
15
16
17
18
19
20
21
22
23
24
25
26
27
28
29
30
31
32
33
34
35
36
37
38
39
40
41
42
43
44
45
46
47
48
49
50
51
52
53
54
55
56
57
|
sbit OneWire_DQ=P3^7;//通信口
void OneWire_Init(void)
{
unsigned char i,AskBit;
OneWire_DQ=1;
OneWire_DQ=0;
i = 227;while (--i);//500um
OneWire_DQ=1;//释放总线
i = 29;while (--i);//70um
AskBit=OneWire_DQ;//主机判断从机是否发送应答
i = 227;while (--i);//500um,要根据时序图构造代码
}
void OneWire_SendBit(unsigned char Bit)//发送一位
{
unsigned char i;
OneWire_DQ=1;
i = 2;while (--i);//10um
OneWire_DQ=Bit;
i = 22;while (--i);//54um
}
unsigned char OneWire_ReadBit(void)//接收一位
{
unsigned char i,Bit;
OneWire_DQ=0;
i = 2;while (--i);//10um
OneWire_DQ=1;//释放总线
i = 2;while (--i);//10um
Bit=OneWire_DQ;
i = 22;while (--i);//54um
return Bit;
}
void OneWire_WriteByte(int Byte)
{
unsigned int i;
for(i=0;i<8;i++)
{
OneWire_SendBit(Byte&(0x01<<i));//低位在前
}
}
unsigned char OneWire_ReadByte()
{
unsigned int i;
unsigned int Byte;
for(i=0;i<8;i++)
{
Byte=OneWire_ReadBit()|(0x01<<i);//低位在前
}
return Byte;
}
|
对OneWire.c进行更改
1
2
3
4
5
6
7
8
9
10
11
12
13
14
15
16
17
18
19
20
21
22
23
24
25
26
27
28
29
30
31
32
33
34
35
36
37
38
39
40
41
42
43
44
45
46
47
48
49
50
51
52
53
54
55
56
57
58
|
sbit OneWire_DQ=P3^7;//通信口
unsigned char OneWire_Init(void)
{
unsigned char i,AskBit;
OneWire_DQ=1;
OneWire_DQ=0;
i = 247;while (--i);//500us
OneWire_DQ=1;//释放总线
i = 29;while (--i);//70us
AskBit=OneWire_DQ;//主机判断从机是否发送应答
i = 247;while (--i);//500um,要根据时序图构造代码
return AskBit;
}
void OneWire_SendBit(unsigned char Bit)//发送一位
{
unsigned char i;
OneWire_DQ=0;//错误,应为0
i = 2;while (--i);//10us
OneWire_DQ=Bit;
i = 20;while (--i);//50us
OneWire_DQ=1;//遗漏
}
unsigned char OneWire_ReadBit(void)//接收一位
{
unsigned char i,Bit;
OneWire_DQ=0;
i = 1;while (--i);//8us
OneWire_DQ=1;//释放总线
i = 1;while (--i);//8us
Bit=OneWire_DQ;
i = 20;while (--i);//50us
return Bit;
}
void OneWire_WriteByte(unsigned char Byte)
{
unsigned char i;
for(i=0;i<8;i++)
{
OneWire_SendBit(Byte&(0x01<<i));//低位在前
}
}
unsigned char OneWire_ReadByte(void)
{
unsigned char i;
unsigned char Byte=0x00;
for(i=0;i<8;i++)
{
if(OneWire_ReadBit()){Byte|=(0x01<<i);}//低位在前
}
return Byte;
}
|
结论:OneWire_SendBit函数对总线的电平处理不正确
void OneWire_SendBit(unsigned char Bit)//发送一位
{
unsigned char i;
OneWire_DQ=1;//此处错误,应为0
i = 2;while (–i);//10us
OneWire_DQ=Bit;
i = 20;while (–i);//50us
OneWire_DQ=1;//遗漏
}
二、DS18B20温度报警器
1
2
3
4
5
6
7
8
9
10
11
12
13
14
15
16
17
18
19
20
21
22
23
24
25
26
27
28
29
30
31
32
33
34
35
36
37
38
39
40
41
42
43
44
45
46
47
48
49
50
51
52
53
54
55
56
57
58
59
60
61
62
63
64
65
66
67
68
69
70
71
72
73
74
75
76
77
78
79
80
81
82
83
84
85
86
87
88
89
90
91
92
93
94
95
96
97
98
99
100
101
102
103
104
105
106
107
108
109
110
111
112
113
114
115
116
117
118
119
120
121
122
123
124
125
126
127
128
129
|
//mark
//在编写单片机程序时,要考虑到运行的高效性,定义变量的数据类型,优先选择较低内存占用的类型
float T;
float Tshow;
char Thigh,Tlow;
unsigned char KeyNum;
void main()
{
Thigh=AT24C02_ReadByte(0);//每次开机,读取存储器中的数据
Tlow=AT24C02_ReadByte(1);
DS18B20_Convert();//温度装载,防止T第一次读取到的是默认值20,消除多余现象
Delay(1000);
LCD_Init();
Timer0_Init();
LCD_ShowString(1,1,"T:");
while(1)
{
DS18B20_Convert();//温度装载
T=DS18B20_Read();
if(T<0)
{
LCD_ShowChar(1,3,'-');
//T=-T,这里T=-T的话,进行温度预置判断有问题,所以再定义一个变量Tshow
Tshow=-T;
}
else
{
LCD_ShowChar(1,3,'+');
Tshow=T;
}
LCD_ShowNum(1,4,Tshow,3);
LCD_ShowChar(1,7,'.');
LCD_ShowNum(1,8,(unsigned char)(Tshow*100)%100,2);
//温度阈值控制
KeyNum=Key();
if(KeyNum)
{
if(KeyNum==1)
{
Thigh++;
if(Thigh>125)
{
Thigh--;
}
}
else if(KeyNum==2)
{
Thigh--;
if(Thigh<=Tlow)
{
Thigh++;
}
}
else if(KeyNum==3)
{
Tlow++;
if(Tlow>=Thigh)
{
Tlow--;
}
}
else if(KeyNum==4)
{
Tlow--;
if(Tlow<-125)
{
Tlow++;
}
}
AT24C02_WriteByte(0,Thigh);
Delay(5);
AT24C02_WriteByte(1,Tlow);
Delay(5);
}
//Thigh=AT24C02_ReadByte(1);
//Tlow=AT24C02_ReadByte(2);错误写法,会导致出现短暂的Thigh或者Tlow被赋值0,AT24C02没来得及读取数据就赋值给变量
LCD_ShowString(2,1,"TH:");
LCD_ShowString(2,10,"TL:");
LCD_ShowSignedNum(2,4,Thigh,3);//显示带符号的数字
LCD_ShowSignedNum(2,13,Tlow,3);
//温度报警,LCD1602显示
if(T>Thigh)
{
LCD_ShowString(1,13,"OV:H");
}
else if(T<Tlow)
{
LCD_ShowString(1,13,"OV:L");
}
else
{
LCD_ShowString(1,13," ");
}
}
}
void Timer0_Routine() interrupt 1 //中断子程序
{
static unsigned int T0Count1;//静态局部变量,保证退出函数之后不销毁
TL0 = 0x66; //设置定时初始值
TH0 = 0xFC; //设置定时初始值
T0Count1++;//每次进入中断子程序,秒控制器自加一
if(T0Count1>=20)
{
T0Count1=0;
Key_Loop();
}
}
|
实验现象1:加入定时器扫描按键后,按下按键不影响温度的读取和显示,但是LCD1602上显示的温度数值会出现闪烁的状态
分析:每隔20ms进入中断程序,对按键进行扫描检测,但是,单总线上对数据的发送和接受,部分过程时间在几十us,远远小于20ms,中断程序打断了温度的正常读取
解决方案:每个OneWire的读写操作加入定时器的关闭动作,这样不会对OneWire的读写操作产生影响
如下:
1
2
3
4
5
6
7
8
9
10
11
12
13
14
15
16
17
18
19
20
21
22
23
24
25
26
27
28
29
30
31
32
33
34
35
36
37
38
39
40
41
42
43
44
45
46
47
48
49
50
51
52
53
54
55
56
57
58
59
60
61
62
63
64
65
66
67
68
|
sbit OneWire_DQ=P3^7;//通信口
unsigned char OneWire_Init(void)
{
unsigned char i,AskBit;
EA=0;
OneWire_DQ=1;
OneWire_DQ=0;
i = 247;while (--i);//500us
OneWire_DQ=1;//释放总线
i = 29;while (--i);//70us
AskBit=OneWire_DQ;//主机判断从机是否发送应答
i = 247;while (--i);//500um,要根据时序图构造代码
EA=1;
return AskBit;
}
void OneWire_SendBit(unsigned char Bit)//发送一位
{
unsigned char i;
EA=0;
OneWire_DQ=0;//错误,应为0
i = 2;while (--i);//10us
OneWire_DQ=Bit;
i = 20;while (--i);//50us
OneWire_DQ=1;//遗漏
EA=1;
}
unsigned char OneWire_ReadBit(void)//接收一位
{
unsigned char i,Bit;
EA=0;
OneWire_DQ=0;
i = 1;while (--i);//8us
OneWire_DQ=1;//释放总线
i = 1;while (--i);//8us
Bit=OneWire_DQ;
i = 20;while (--i);//50us
EA=1;
return Bit;
}
void OneWire_WriteByte(unsigned char Byte)
{
unsigned char i;
EA=0;
for(i=0;i<8;i++)
{
OneWire_SendBit(Byte&(0x01<<i));//低位在前
}
EA=1;
}
unsigned char OneWire_ReadByte(void)
{
unsigned char i;
unsigned char Byte=0x00;
EA=0;
for(i=0;i<8;i++)
{
if(OneWire_ReadBit()){Byte|=(0x01<<i);}//低位在前
}
EA=1;
return Byte;
}
|
缺点:对定时器有较大影响,需要区分任务的优先级,这里我们只有对温度进行处理的任务,一但存在多个任务,比如这里同时在数码管上显示一个时钟,使用单总线的局限性会非常大
IIC通信方式一般比单总线广泛地多
思考:IIC和单总线地区别
蓝桥杯(STC15)拓展
OneWire底层
1
2
3
4
5
6
7
8
9
10
11
12
13
14
15
16
17
18
19
20
21
22
23
24
25
26
27
28
29
30
31
32
33
34
35
36
37
38
39
40
41
42
43
44
45
46
47
48
49
50
51
52
53
54
55
56
57
58
59
60
61
62
63
64
65
66
67
68
69
70
71
72
73
74
75
76
77
78
79
80
81
82
|
#include <onewire.h>
sbit DQ= P1^4;
void Delay_OneWire(unsigned int t)
{
t *= 12;
while(t--);
}
void Write_DS18B20(unsigned char dat)
{
unsigned char i;
for(i=0;i<8;i++)
{
DQ = 0;
DQ = dat&0x01;
Delay_OneWire(5);
DQ = 1;
dat >>= 1;
}
Delay_OneWire(5);
}
unsigned char Read_DS18B20(void)
{
unsigned char i;
unsigned char dat;
for(i=0;i<8;i++)
{
DQ = 0;
dat >>= 1;
DQ = 1;
if(DQ)
{
dat |= 0x80;
}
Delay_OneWire(5);
}
return dat;
}
bit init_ds18b20(void)
{
bit initflag = 0;
DQ = 1;
Delay_OneWire(12);
DQ = 0;
Delay_OneWire(80);
DQ = 1;
Delay_OneWire(10);
initflag = DQ;
Delay_OneWire(5);
return initflag;
}
float ds18b20_read(void)
{
unsigned char low,high;
init_ds18b20();
Write_DS18B20(0xcc);
Write_DS18B20(0x44);
init_ds18b20();
Write_DS18B20(0xcc);
Write_DS18B20(0xbe);
low=Read_DS18B20();
high=Read_DS18B20();
return((high << 8 )| low) /16.0;
}
|
主模块(DS18B20模拟题)
1
2
3
4
5
6
7
8
9
10
11
12
13
14
15
16
17
18
19
20
21
22
23
24
25
26
27
28
29
30
31
32
33
34
35
36
37
38
39
40
41
42
43
44
45
46
47
48
49
50
51
52
53
54
55
56
57
58
59
60
61
62
63
64
65
66
67
68
69
70
71
72
73
74
75
76
77
78
79
80
81
82
83
84
85
86
87
88
89
90
91
92
93
94
95
96
97
98
99
100
101
102
103
104
105
106
107
108
109
110
111
112
113
114
115
116
117
118
119
120
121
122
123
124
125
126
127
128
129
130
131
132
133
134
135
136
137
138
139
140
141
142
143
144
145
146
147
148
149
150
151
152
153
154
155
156
157
158
159
160
161
162
163
164
165
166
167
168
169
170
171
172
173
174
175
176
177
178
179
180
181
182
183
184
185
186
187
188
|
#include <Key.h>
#include <Nixie.h>
#include <LED.h>
#include <Timer0.h>
#include <Init.h>
#include <onewire.h>
#include <iic.h>
unsigned char Nixie_Buf[8]={10,10,10,10,10,10,10,10};
unsigned char Nixie_Pos;
unsigned char Nixie_Point[8]={0,0,0,0,0,0,0,0};
unsigned char Nixie_Disp_Mode;
unsigned char Key;
unsigned char Key_Up,Key_Down,Key_Val,Key_Old;
unsigned char ucLED[8]={0,0,0,0,0,0,0,0};
unsigned int Nixie_Timer;
unsigned int Key_Timer;
float Tempture=0;
unsigned char Tempture_Disp=25;
unsigned char Tempture_Control=25;
float DAC_Output=3.25;
bit DAC_Output_MODE;
void Key_Proc(void)
{
if(Key_Timer) return;
Key_Timer=1;
Key_Val=Key_Read();
Key_Down=Key_Val & (Key_Old ^ Key_Val);
Key_Up=~Key_Val & (Key_Old ^ Key_Val);
Key_Old=Key_Val;
switch(Key_Down)
{
case 4:
if(Nixie_Disp_Mode==0){Tempture_Disp=Tempture_Control;}
if(Nixie_Disp_Mode==1){Tempture_Control=Tempture_Disp;}
if(++Nixie_Disp_Mode==3){Nixie_Disp_Mode=0;}
break;
case 5:
DAC_Output_MODE^=1;
break;
case 8:
if(Nixie_Disp_Mode==1)
{
if(++Tempture_Disp==100){Tempture_Disp=0;}
}
break;
case 9:
if(Nixie_Disp_Mode==1)
{
if(--Tempture_Disp==255){Tempture_Disp=99;}
}
break;
}
}
void Nixie_Proc(void)
{
if(Nixie_Timer) return;
Nixie_Timer=1;
Tempture=ds18b20_read();
switch(Nixie_Disp_Mode)
{
case 0:
Nixie_Buf[0]=13;
Nixie_Buf[1]=10;
Nixie_Buf[2]=10;
Nixie_Buf[3]=10;
Nixie_Buf[4]=(unsigned char)Tempture/10;
Nixie_Buf[5]=(unsigned char)Tempture%10;
Nixie_Point[5]=1;
Nixie_Buf[6]=(unsigned int)(Tempture*10)%10;
Nixie_Buf[7]=(unsigned int)(Tempture*100)%10;
break;
case 1:
Nixie_Buf[0]=17;
Nixie_Buf[1]=10;
Nixie_Buf[2]=10;
Nixie_Buf[3]=10;
Nixie_Buf[4]=10;
Nixie_Buf[5]=10;
Nixie_Point[5]=0;
Nixie_Buf[6]=Tempture_Disp/10;
Nixie_Buf[7]=Tempture_Disp%10;
break;
case 2:
Nixie_Buf[0]=11;
Nixie_Buf[1]=10;
Nixie_Buf[2]=10;
Nixie_Buf[3]=10;
Nixie_Buf[4]=10;
Nixie_Buf[5]=(unsigned char)DAC_Output;
Nixie_Point[5]=1;
Nixie_Buf[6]=(unsigned char)(DAC_Output*10)%10;
Nixie_Buf[7]=(unsigned int)(DAC_Output*100)%10;
break;
}
}
void LED_Proc(void)
{
unsigned int i;
DA_Write((unsigned char)(51*DAC_Output));
if(DAC_Output_MODE==0)
{
if(Tempture<Tempture_Control)
{
DAC_Output=0;
}
else
{
DAC_Output=5.0;
}
}
else
{
if(Tempture<20)
{
DAC_Output=1.0;
}
if(Tempture>40)
{
DAC_Output=4.0;
}
else
{
DAC_Output=0.15*(Tempture-20)+1.0;
}
}
ucLED[0]=~DAC_Output_MODE;
for(i=0;i<3;i++)
{
ucLED[i+1]= (i==Nixie_Disp_Mode);
}
}
void Delay750ms()
{
unsigned char i, j, k;
i = 35;
j = 51;
k = 182;
do
{
do
{
while (--k)
;
} while (--j);
} while (--i);
}
void main()
{
Tempture=ds18b20_read();
Delay750ms();
Timer0_Init();
System_Init();
while(1)
{
Key_Proc();
Nixie_Proc();
LED_Proc();
}
}
void Timer0_Server(void) interrupt 1
{
if(++Nixie_Timer==300){Nixie_Timer=0;}
if(++Key_Timer==10){Key_Timer=0;}
if(++Nixie_Pos==8){Nixie_Pos=0;}
Nixie_Disp(Nixie_Pos,Nixie_Buf[Nixie_Pos],Nixie_Point[Nixie_Pos]);
LED_Disp(Nixie_Pos,ucLED[Nixie_Pos]);
}
|



![【stm32单片机】[操作系统][RT-Thread][3]线程通信](/img/blog_cover/rt-thread.jpg)