# OpenCV中文文档
一、图像处理常见基本概念
1.BGR和RGB格式
BGR和RGB是两种常见的颜色编码格式,它们在像素颜色排列的顺序上有所不同:
- RGB格式:
- RGB指的是红色(R)、绿色(G)、蓝色(B)三个颜色通道的顺序。
- 在RGB格式中,像素的颜色值按照红、绿、蓝的顺序排列,即最开始的三个字节依次表示红色、绿色和蓝色分量。
- BGR格式:
- BGR则是蓝色(B)、绿色(G)、红色(R)的顺序。
- 在BGR格式中,像素的颜色值按照蓝、绿、红的顺序排列,即最开始的三个字节依次表示蓝色、绿色和红色分量。
这两种格式主要在图像处理中有所区别。例如,在OpenCV中,默认情况下读取的图像格式是BGR而非RGB,这意味着你在处理图像数据时需要注意颜色通道的顺序。如果需要与其他软件或标准的RGB格式进行交互,通常需要进行颜色通道的重新排列。
总结:
- RGB:红色、绿色、蓝色,像素颜色排列顺序是RGB。
- BGR:蓝色、绿色、红色,像素颜色排列顺序是BGR。
RGB格式的缺陷:自然条件下截取的图像,容易受到光线的影响,即对亮度比较敏感,RGB的三个分量都会受亮度的影响。
2. HSV格式
在图像处理中使用较多的是 HSV 颜色空间,它比 RGB 更接近人们对彩色的感知经验。非常直观地表达颜色的色调、鲜艳程度和明暗程度,方便进行颜色的对比。
在 HSV 颜色空间下,比 RGB 更容易跟踪某种颜色的物体,常用于分割指定颜色的物体。
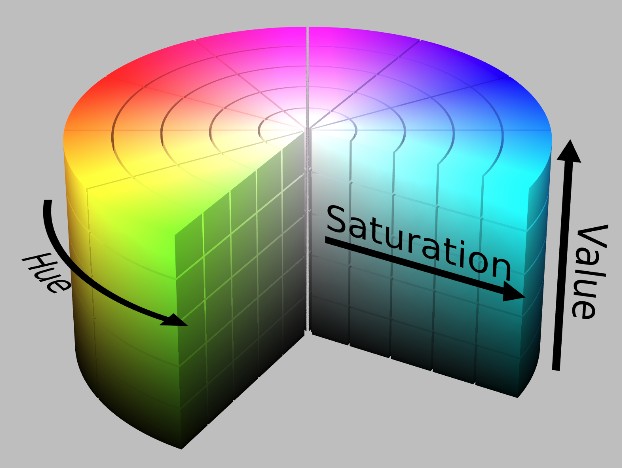
HSV 表达彩色图像的方式由三个部分组成:
- Hue(色调、色相),相当于基调,是下图的俯视图得到的圆,圆上不同位置的颜色基调不同,把颜色分成了360°,每个位置有不同的颜色基调;
- Saturation(饱和度、色彩纯净度):纯度,沿着俯视图得到的圆的半径看,因为圆弧上的点代表该处的颜色的基调,那么半径上就是从纯白色到该基调颜色过渡过程中不同位置的纯度,在圆心处纯度为0,在圆弧上(该色调)纯度为100;
- Value(明度):亮度,沿着圆柱的高来看,圆柱表面上平行于圆柱轴上的点的颜色基调相同,纯度也相同,但是明暗程度不同。同时,该圆柱的半径也不同,相当于磁盘的柱面。
用下面这个圆柱体来表示 HSV 颜色空间,圆柱体的横截面可以看做是一个极坐标系 ,H 用极坐标的极角表示,S 用极坐标的极轴长度表示,V 用圆柱中轴的高度表示。

3. 分辨率和像素
1、像素是指照片的点数(表示照片是由多少点构成的),分辨率是指照片像素点的密度(是用单位尺寸内的像素点,一般用每英寸多少点表示–dpi)。照片实际大小是像素决定的。一个像素很大的照片,如果将分辨率设置很大的话,打印出来的照片可能并不大(但是很清晰)。反之,一个像素并不很大的照片,如果将分辨率设置得很小,那么打印出来的照片可能很大(但是不清晰)。
2、 分辨率指单位长度上的像素值,与打印质量有关,一般使用的量纲为PPI; 总像素指图片的样本精度,与可打印尺寸有关,通常使用“长×宽”的方式表示,乘积就是通常所说的总像素。由于图片的宽高比不同,所以,同一总像素可以有多种规格。
4. ROI区域
在计算机视觉和图像处理中,感兴趣区域(Region of Interest, ROI)是指图像中特别关注的部分。ROI 通常用于提取图像中的特定区域进行进一步的处理和分析,比如特征提取、对象识别、图像分割等。
ROI 的主要作用:
- 减少处理时间:通过只处理图像中的特定区域,可以显著减少处理时间,提高效率。
- 集中处理目标:可以将处理的焦点集中在图像中最相关的部分,忽略背景或其他不相关的区域。
- 提高精度:在某些情况下,ROI 的提取可以提高图像处理的精度,尤其是在目标对象占据图像较小区域时。
如何定义和提取 ROI:
通常,ROI 是一个矩形区域,可以通过指定其左上角和右下角的坐标来定义。在 OpenCV 中,可以通过数组切片的方式来提取 ROI。
示例代码:
以下是一个使用 OpenCV 提取 ROI 的简单示例:
2
3
4
5
6
7
8
9
10
11
12
13
14
15
16
17
18
19
# 读取图像
image = cv2.imread('image.jpg')
# 定义ROI的坐标(左上角和右下角)
x1, y1 = 100, 100 # 左上角坐标
x2, y2 = 300, 300 # 右下角坐标
# 提取ROI区域
roi = image[y1:y2, x1:x2]
# 显示原图和ROI区域
cv2.imshow('Original Image', image)
cv2.imshow('ROI', roi)
# 等待按键
cv2.waitKey(0)
cv2.destroyAllWindows()代码说明:
- 读取图像:使用
cv2.imread()读取图像文件。- 定义 ROI:通过指定矩形的左上角
(x1, y1)和右下角(x2, y2)坐标来定义感兴趣区域。- 提取 ROI:使用切片操作
image[y1:y2, x1:x2]提取 ROI 区域。- 显示图像:使用
cv2.imshow()显示原图和提取的 ROI。注意事项:
- 坐标有效性:确保 ROI 的坐标在图像的范围内,否则会导致错误。
- 矩形定义:左上角坐标
(x1, y1)应小于右下角坐标(x2, y2)。应用场景:
- 目标检测:提取图像中检测到的目标区域进行进一步分析。
- 图像分割:提取图像中特定的分割区域进行处理。
- 特征提取:只对感兴趣的区域进行特征提取,减少计算量。
通过合理定义和提取 ROI,可以有效地提高图像处理的效率和精度。
二、OpenCV介绍
OpenCV(open source computer vision library)是一个基于BSD许可(开源)发行的跨平台计算机视觉库,可以运行在Linux、Windows、Android和Mac OS操作系统上。
它轻量级而且高效——由一系列 C 函数和少量 C++ 类构成,同时提供了Python、Ruby、MATLAB等语言的接口,实现了图像处理和计算机视觉方面的很多通用算法。
OpenCV用C语言编写,它的主要接口也是C语言,但是依然保留了大量的C语言接口。
安装opencv
1 | pip install opencv-python |
三、OpenCV常用接口
一、图像入门
Opencv常见相关功能库:
- numpy
- Matplotlib
1. 读取图像
cv2.imread()
- cv.IMREAD_COLOR: 加载彩色图像。任何图像的透明度都会被忽视。它是默认标志。
- cv.IMREAD_GRAYSCALE:以灰度模式加载图像
- cv.IMREAD_UNCHANGED:加载图像,包括alpha通道
注意: 除了这三个标志,你可以分别简单地传递整数1、0或-1。
1 | import numpy as np |
2. 显示图像与用户交互
cv2.imshow()
使用函数**cv2.imshow()**在窗口中显示图像。窗口自动适合图像尺寸。
第一个参数是窗口名称,它是一个字符串。第二个参数是我们的对象。可以根据需要创建任意多个窗口,可以使用不同的窗口名称
cv.waitKey()是一个键盘绑定函数。其参数是以毫秒为单位的时间。该函数等待任何键盘事件指定的毫秒。如果您在这段时间内按下任何键,程序将继续运行。如果0被传递,它将无限期地等待一次敲击键。
cv.destroyAllWindows()破坏创建的所有窗口。
cv.destroyWindow()在其中传递确切的窗口名称作为参数。
示例代码:
1 | cv.imshow("img",img_file) |
PS: cv.namedWindow()可以创建一个空窗口
1 | cv.namedWindow('image',cv.WINDOW_NORMAL) |
3. 写入图像
cv2.imwrite()
第一个参数是文件名,第二个参数是要保存的图像。
1 | cv.imwrite('messigray.png',img) |
这会将图像以PNG格式保存在工作目录中。
# 示例总结
加载灰度图像,显示图像,按s保存图像,按Esc退出
1 | import numpy as np |
# Matplotlib
Matplotlib 是 Python 2D-绘图领域使用最广泛的套件。它能让使用者很轻松地将数据图形化,并且提供多样化的输出格式。
1 | # 使用matplotlib库 |
二、视频入门
1. 驱动相机读取视频
可以通过cap.isOpened()方法检查它是否已初始化。如果是True,那么确定。否则,使用cap.open()打开它
cap.read()返回布尔值(True/ False)。如果正确读取了帧,它将为True。因此,你可以通过检查此返回值来检查视频的结尾
1 | import cv2 as cv |
注意:waitKey() 传入参数’0’会导致视频显示卡在一帧中
正确使用方法:
2
breakwaitKey()相当于一个阻塞式的函数,如
delay()
2. 获取视频格式
可以使用cap.get(propId)方法访问该视频的某些功能,其中propId是0到18之间的一个数字。每个数字表示视频的属性(如果适用于该视频),并且可以显示完整的详细信息在这里看到:cv::VideoCapture::get()
例如,我可以通过cap.get(cv.CAP_PROP_FRAME_WIDTH)和cap.get(cv.CAP_PROP_FRAME_HEIGHT)检查框架的宽度和高度
3. 设置视频格式
默认情况下,视频的分辨率为640x480,使用cap.set()设置即可
cap.set(cv.CAP_PROP_FOURCC, codec)cap.set(cv.CAP_PROP_FPS, 30)#帧数cap.set(cv.CAP_PROP_FRAME_WIDTH, 1920)#列 宽度cap.set(cv.CAP_PROP_FRAME_HEIGHT, 1080)# 行 高度
PS : codec = cv.VideoWriter_fourcc('M', 'J', 'P', 'G')
**一、简介 **
cv2.VideoWriter_fourcc是 OpenCV 中用于定义视频编解码器的函数,它将四个字符的编码(FourCC)转换为一个用于视频编码器的整数。FourCC 是一种四字符编码,用于指定视频文件中使用的压缩方式。二、语法和参数
- 语法
cv2.VideoWriter_fourcc(c1, c2, c3, c4)
2.参数
c1, c2, c3, c4:表示四个字符的编码,每个字符是一个字符,代表不同的视频编码器。常用的编码器包括:
- ‘XVID’:常用于 .avi 格式的视频文件。
- ‘MP4V’:常用于 .mp4 格式的视频文件。
- ‘MJPG’:适用于使用 Motion JPEG 编码的视频。
3.返回值
返回一个整数,该整数用于创建 cv2.VideoWriter 对象时指定视频编码格式。
1 | import cv2 as cv |
4. 保存视频
1 | import cv2 as cv |
5. 播放视频
跟捕获摄像头一致,只需要修改捕获的对象即可
如:
1 | import numpy as np |
三、绘图功能
四、鼠标事件
五、滑块调参
cv.createTrackbar():
-
第一个参数是轨迹栏名称
-
第二个参数是它附加到的窗口名称
-
第三个参数是默认值
-
第四个参数是最大值
-
第五个是执行的回调函数每次跟踪栏值更改
Opencv本身没有提供按钮相关的api,可以利用滑块函数,设定参数值为0/1,达到按钮的效果。
cv.getTrackbarPos()
-
第一个参数是轨迹栏名称
-
第二个参数是窗口名称
使用
cv.getTrackbarPos()函数,在主循环中可以实时响应滑块调节的对应轨道参数值
示例程序
1 | import numpy as np |
四、OpenCV核心操作
一、图像的基本操作
二、图像的位运算
三、性能优化
1. 衡量代码性能的方式
cv.getTickCount函数返回从参考事件(如打开机器的那一刻)到调用此函数那一刻之间的时钟周期数。因此,如果在函数执行之前和之后调用它,则会获得用于执行函数的时钟周期数。
cv.getTickFrequency函数返回时钟周期的频率或每秒的时钟周期数。因此,要找到执行时间(以秒为单位),你可以执行以下操作:
1 | e1 = cv.getTickCount() |
除了OpenCV,Python还提供了一个模块time,这有助于衡量执行时间。另一个模块profile有助于获取有关代码的详细报告,例如代码中每个函数花费了多少时间,调用了函数的次数等。
2. OpenCV默认的性能优化
许多 OpenCV 函数都是使用 SSE2、 AVX 等进行优化的。 它还包含未优化的代码。因此,如果我们的系统支持这些特性,我们就应该利用它们(几乎所有现代的处理器都支持它们)。在编译时默认启用它。因此,如果启用了 OpenCV,它将运行优化的代码,否则它将运行未优化的代码。可以使用 cvUseoptimized 检查是否启用 / 禁用和 cvSetuseoptimized 以启用 / 禁用它。让我们看一个简单的例子。
1 | # 检查是否启用了优化 |
优化的中值滤波比未优化的版本快2倍。如果你检查其来源,可以看到中值滤波是 SIMD 优化。因此,可以使用它在代码顶部启用优化(默认启用的)
3. 性能优化方式
在Python和NumPy中优化性能的技术和编码方法的关键技术:
1. 避免显式循环
- 描述:尽量避免使用
for循环,尤其是双重或三重循环。使用NumPy的向量化操作。- 来源:NumPy User Guide - Array Programming
2. 向量化操作
- 描述:利用NumPy的数组运算和广播功能来实现高效的向量化操作,避免逐元素计算。
- 来源:NumPy Vectorization
3. 缓存一致性
- 描述:确保数据在内存中的布局有利于CPU缓存,从而提高访问速度。例如,使用行优先的存储方式。
- 来源:Understanding Cache and Memory
4. 避免不必要的数组复制
- 描述:尽量使用数组视图而非副本,这样可以减少内存开销。使用
np.view()或切片来创建视图。- 来源:NumPy Views
5. 使用Cython和Numba
描述
:如果在使用NumPy和向量化后代码仍然很慢,可以考虑使用Cython或Numba对性能关键部分进行加速。
- Cython:允许将Python代码转换为C,以提高性能。
- Numba:通过JIT编译加速NumPy代码,特别是循环。
来源:
- Cython Documentation
- Numba Documentation
6. 使用并行计算
- 描述:对于大规模计算任务,可以利用并行处理库(如
multiprocessing或joblib)来加速计算。- 来源:Python Multiprocessing
7. Profiling和性能分析
- 描述:使用性能分析工具(如
cProfile和line_profiler)找出性能瓶颈,针对性优化。- 来源:
8. 利用科学计算库
- 描述:对于特定任务,利用专门的科学计算库(如SciPy、Pandas)进行更高效的数据处理和分析。
- 来源:SciPy Documentation
# 向量化
在Python中,向量化主要是指使用NumPy和其他库(如Pandas和TensorFlow)来处理数组和矩阵数据的能力,从而提高计算效率。以下是一些在Python中向量化的常见用法:
1. 使用NumPy进行向量化
NumPy是Python中用于数值计算的库,它提供了高效的数组操作。通过向量化,你可以避免使用显式的循环,从而提高代码的性能。
2
3
4
5
6
7
8
9
10
11
12
# 创建一个NumPy数组
a = np.array([1, 2, 3, 4, 5])
# 向量化操作:所有元素加2
b = a + 2
print(b) # 输出: [3 4 5 6 7]
# 向量化操作:所有元素平方
c = a ** 2
print(c) # 输出: [ 1 4 9 16 25]2. 使用Pandas进行向量化
Pandas是用于数据分析的库,它提供了类似于NumPy的向量化操作,适用于处理DataFrame和Series对象。
2
3
4
5
6
7
8
# 创建一个Pandas Series
s = pd.Series([1, 2, 3, 4, 5])
# 向量化操作:所有元素乘以3
s2 = s * 3
print(s2) # 输出: 0 3, 1 6, 2 9, 3 12, 4 153. 使用TensorFlow进行向量化
在深度学习中,TensorFlow也广泛使用向量化来进行大规模的矩阵运算。
2
3
4
5
6
7
8
# 创建一个TensorFlow张量
x = tf.constant([1, 2, 3, 4, 5])
# 向量化操作:所有元素加5
y = x + 5
print(y.numpy()) # 输出: [ 6 7 8 9 10]总结
向量化通过批量处理数据,减少了循环的使用,从而提高了代码的性能和可读性。在进行数值计算时,推荐尽量使用向量化的方法。


![【stm32单片机】[操作系统][RT-Thread][3]线程通信](/img/blog_cover/rt-thread.jpg)